
Update – DIY Wire Compost Bin – Easy!
Update – DIY Wire Compost Bin – Easy!
[ Update June 2020, see below for March 2021 update ]
So I just got a request to post an update on how my new hardware cloth / wire compost bin has been working out. Which was timely, because I had been planning to post an update and this reminder helped motivate me to get on it. Visit the original article to see how I built this easy DIY wire compost bin and read up on why I switched to this method.

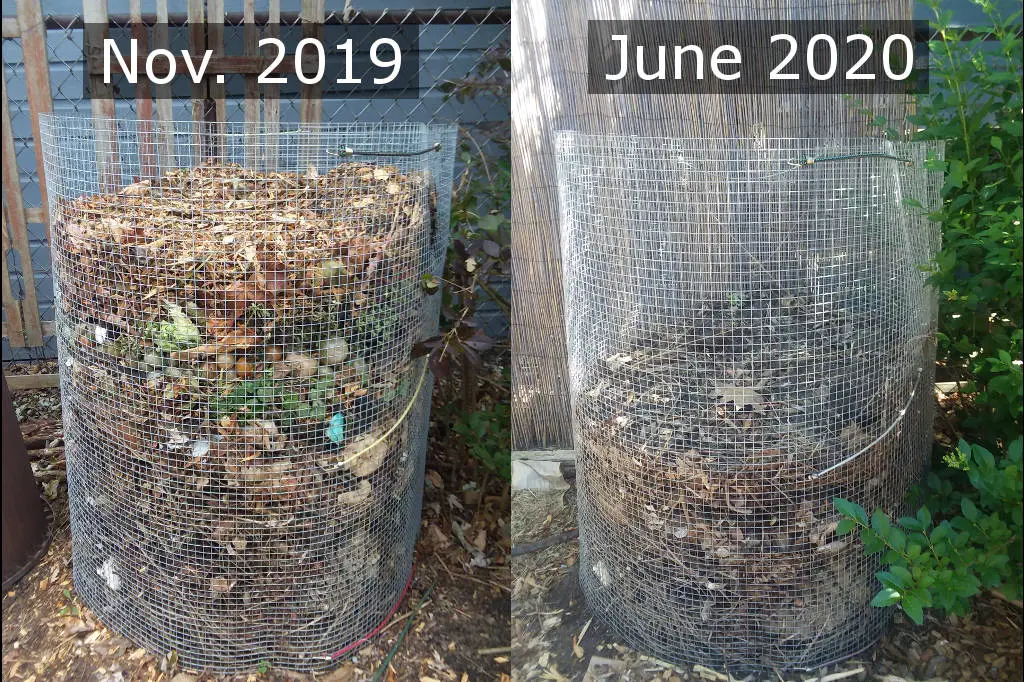
First off, I really like these bins made from the pre-cut hardware cloth fencing I bought at Lowe’s. They still look brand new and I expect I’ll be able to use them for many years. They hold plenty of “stuff” which is what I needed. The photo above shows what the bin looked like in November when I filled it up and stopped adding to it, versus today.
Once I filled this bin up by mid-November, I added a layer of wood chips over the top and stopped adding anymore to it. I then set up another identical bin in another spot (outside my sliding glass door actually, it was nice to be able to dump out the compostables in the winter without having to go outside).
Benefits of This Wire Bin Composting Method
- It’s easy. I don’t toss it or do anything to maintain it. I just keep a couple old trash cans (with lids) full of dry leaves I raked up in spring and fall, and/or wood chips (our city has big piles of free wood chips you can take for mulch). Whenever I have a thick layer of food scraps piled up, I cover it with a layer of leaves or wood mulch. That’s all I do.
- It holds a lot. Every year I end up having to buy at least 2-3 big bags of potting soil to have enough for all my pots of potatoes, flowers and so on. My goal is to eventually never have to buy any potting soil anymore, so I am trying to create as much compost as possible to get to that point and I think these bins will allow me to do that by next year.
- It’s well-aerated. As you can see, this method allows plenty of air flow.
- It doesn’t smell. You might worry that since it is wide open, it will smell. But I have found the opposite. Since it is “rotting” much more slowly and gets plenty of air, I have found my new wire compost bin has almost no odor at all, unlike my old trash can bin which was pretty stinky.
Drawbacks of the Wire Bin Composting Method

- It’s slow. If you are in a big hurry to get finished compost, this is not the method for you. I have read that it may take up to two years for the compost to completely break down.
- It’s hard to keep moist. This bin drains quickly and tends to be dry, which is probably one of the reasons it takes a long time for the organic matter to break down. In the winter, to help it out, whenever we had a heavy snow I would shovel heaps of snow on top to melt into the pile. I don’t use tap water on compost because it has chlorine (or chloramine) in it, which kills the critters and bacteria your pile needs to break down. I need to get a rain barrel so I can water it with non-chlorinated rainwater.
- Critters may get into it. There is a dent on one side of my new bin which I suspect is from a raccoon climbing into it. My feeling is, if he wants to scavenge around in there once in a while, it doesn’t bother me, we’ve never run into each other. But if you have a critter concern, this may attract them.
Getting to Finished Compost
[ Update March 2021 ]
In fall of 2020, my second bin was getting pretty full and I needed the use of the first bin. So I decided to lift up the wire frame and see how the compost looked. It had compressed in size a lot, but the visible materials around the outside edge of the bin still seemed unfinished. However, once I dug a shovel into it, I found that aside from the stuff around the edges, the rest was quite well broken down and composted.
I took a few not-fully-composted items and threw them into the newer bin, and the rest of the compost I spread around on my garden to fertilize the soil over the winter. It looked great! Dark and rich. I anticipate that I am going to have a great veggie yield this year! I also recently capped off my second bin with wood chips and hope to be able to use it on the garden next year (2022).
Note: I was surprised to find that the mini bungees had rotted away. It wasn’t a big deal, because the bin held together without them, but I was surprised that they didn’t last. I might just use some twine or wire to hold these bin together in future.
New to composting? Check out Composting 101 for an intro guide to getting started with composting.


Thanks for adding an update. I stumbled on your original post while planning my own no turn compost bin. Seeing an update is very motivational!